
NEWS, EDITORIALS, REFERENCE
Load and Run from 6502 ASM (1/2)
I'd originally planned this discussion to be a single post. But it turns out there was a lot to talk about, so I've split it into two parts. This is the first part which talks about what technically goes on when the computer is powered up or restarted, and how programs get loaded into memory and run. The second part, discusses exactly what the difficulties have become with loading C64 software on modern conglomerates of hardware, and how similar problems have been addressed on other platforms. Part 2 will then get into the programming details of how to solve this problem on the C64.
When the Commodore 64 first came out there were two common storage devices that people would get along with it. If you were in Britain or certain parts of Europe you probably had a Datasette which could store and retrieve data from standard compact cassette tapes, the kind usually used for audio. If you were in North America, or some other parts of Europe, you likely had a 1541 floppy disk drive.
Most commercial software came packaged in one of these two formats. For me, personally, the cassette-based Datasette fell out of use after the Commodore VIC-20. Although the C64 has a cassette port on the back, and the original KERNAL ROM still supports loading software from cassette, loading from disk is superior in almost every way. Disks are thinner and lighter, they have a higher storage capacity, have a faster load time and allow for random access to read and write data. With the ability for random access, a disk drive also allows you to load and list a directory of the disk's contents. You can then load a program by its name and the directory tells the drive's DOS precisely where on the disk to find the first block of that file's chain of data.


There were some advantages to loading from tape. Many games used special tape loader software that could display a beautiful splash screen while the game was loading in, this generally was not the case with disk-based games.
Today, of course, there is still the nostalgia factor for cassettes, if that's what you grew up with. But that's all I'll say about tapes. They were popular in parts of the world, but I don't have much nostalgia for them personally as they were never a part of my experience with the Commodore 64.
Using a C64 Program
If you're used to a modern Mac or PC, the first run experience of using a C64 can seem utterly baffling. You have to learn and remember a bunch of arcane commands??! It wasn't ever quite that bad. Here were the steps you would typically go through to use a program on a Commodore 64:
- Turn on the monitor, turn on the disk drive, turn on the C64.
- Find the disk containing the program, and read any instructions on its sticker.
- Insert the disk into the drive and close the door.
- Type the instructions you read from the sticker.

An example appears above. Not every disk has the loading instructions printed on them, certainly, but many do. And those that don't would have the loading instructions printed in the first couple of pages of the user manual or guide. Therefore, it wasn't really necessary to know how to use a Commodore 64. To play a game, or indeed to run most any other commercial software product, everything there was to know could be summarized in about 3 short sentences:
- Plug a joystick into port 2
- Type load "*",8,1 and press [RETURN]
- Follow the on-screen instructions *
Actually, there is one other trick that any would-be C64 user ought to know that isn't exactly explicit. If you're on a screen of a program and you don't see any instructions and it doesn't seem to be progressing on its own to the next stage, 99% of the time, pushing the space bar will work. And if not, press fire on the joystick.
For games in particular, this was often the extent of what you needed to know. It was not even necessary to understand what the elements of that load command are doing. But we're here to dig a lot deeper than that. So let's do it.
Devices, Device 8, and Short-Sighted Developers
I'm sometimes surprised by what some people—who like and who own C64s—don't know about how their C64 works. I asked at one of our local retro computer club meetings sometime last year if they know why the typical disk drive is on device 8. The consensus was that they didn't really know. It does seem odd though. There is only one disk drive, so, why isn't it device 1? Or maybe even 0?
The C64's KERNAL, either based upon or bearing striking familial relationship to the KERNAL found in all of Commodore's 8-bit line (PET, VIC-20, Plus/4, C16, C116, C128, etc.), manages 31 devices. That sounds like an odd number too. Why isn't it 32 devices at least?1 Because device numbers go from 0 to 31, but #31 is reserved as a broadcast channel, for sending commands to all devices simultaneously.
A few devices are built-in, based on hardware available already in the computer. The basic gist is that the keyboard and the screen are treated as generic I/O devices, plus there is RS-232 over the User Port, and the Datasette over the Cassette Port. That's 4 devices right there. The next four device numbers are reserved for 2 printers and 2 plotters. Bingo, we've just used device numbers from 0 to 7. This leaves device numbers 8 to 30 for storage devices.
Right from the very beginning, it was known that a C64's storage devices could be on any of 23 different device numbers. So why is device 8 the only one anyone remembers?
There are several reasons. The first is that a floppy drive was quite expensive. In 1982 when the 1541 was first introduced it cost $400 USD, which is the equivalent of over a $1000 USD in today's money. That's a lot of doe to drop on a giant, slow, lumbering beast that only gives you 170 kilobytes of storage in one place. I don't have the sales numbers in front of me, but my guess is that out of all the people who bought one, the large majority didn't have a second one.

The next thing to say is that, out of the box, every 1541 disk drive came hardcoded to be on device 8. And I really mean hard coded. It wasn't until the 1541-II and 1571 that came out a few years later that floppy drives included DIP switches on the back to change their default device number. What's more, even if you opened the top case and removed the shield, (which probably voided your warranty and believe me, you would have wanted your warranty intact after dropping so much money on a device that could easily start malfunctioning), there weren't even jumpers inside that you could carefully change. A 1541's mainboard has jumper pads which you can only open or close with a knife or a soldering iron, respectively.
That's better than nothing, but this is definitely not something that an ordinary user would have been able to do.
So those are two reasons: It was damn near impossible to change the device number of your 1541 from its default of 8, although it hardly mattered because the great majority of users only ever had one and therefore had no need to change the default device number.
There is another reason too, though. This one is more philosophical. Having multiple devices that share a bus, manually configuring them with unique device numbers, and then never knowing what most users have done with their configuration, it complicates everything. It adds a whole layer of complexity onto what is otherwise very simple.
Think about the sticker on that floppy disk, above. They printed directly onto the disk the instructions you need to type to load and run the program. The sticker says load "*",8,1 and that's what you type, and lo and behold it works. That's conceptually much simpler than:
load "*",{dev#},1
Where {dev#} is the device number of the disk drive you've put the disk into.
Despite these reasons though, Commodore is gone now. And their business and technical short-sightedness is often stated as one of the many reasons they foundered.
For all the reasons above, C64 developers had no reason to support anything other than device 8. Most developers in those days were working on a shoe-string budget, rushing to complete their game and get it to market as quickly as possible, and then on to the next one. It was not going to make one iota of difference to their bottomline if their game supported the technical range of extra hardware capabilities of the machine. But it would take extra time and care to program and test, and (nominally) extra memory, to support.
Apple was the sort of company that would give its developers a slap on the wrist if they did something that was good for them but bad for the longterm future of Apple. Commodore was never so forethoughtful. And so without guidance (or sanction) from Commodore, saying, Hey, you guys, our machines support multiple disk drives, stop boxing our users into a corner with your quick and dirty device number hardcoding!… there was truly no incentive, from the bottom or from the top, to "do the right thing" for the future of the platform.
The serious user, the modern user, and newer devices
Nonetheless, there were more serious users. GEOS, for example, could be greatly improved by adding more to your computer than the basic setup of: computer, monitor, disk drive, joystick. Adding a mouse was a huge boon to productivity, and so was a printer, and most certainly a second disk drive. One disk drive could be for system and application files, and the other disk drive could hold a work disk giving you lots of room for documents and extras.
Another common example of a more serious user was the BBS user, or the BBS host. Adding a modem to your computer opened many doors, but having an extra drive to download or upload data to or from, in addition to the disk drive containing the terminal software, was very useful. And for the BBS host it was even more important, because they needed more storage space to hold the files and messages of their users. Later in the life of the C64 higher capacity disks and then harddrives could be used to fill this gap.
Thankfully the C64 really does support all these extras, even if the common setup didn't make use of it all. But there was and still is a nasty problem. The great bulk of software, games and otherwise, was written in the early to middle commercial life of the computer. Later software undoubtedly got better at supporting more hardware, and the hardware itself got better at sharing the computer with other hardware. But because of the commercial decline of the C64, there has always been less of the newer more congenial software than there is of the older more rigid software. And, unfortunately, even into the late life and the healthy afterlife of the C64, there continue to be developers who code for one floppy drive like it's 1983.
The line of storage devices from Creative Micro Designs, that came during the very late 80s and through the 90s, are certainly considered late life, and perhaps even afterlife devices for the C64. CMD recognized very clearly that users, even if they bought a shiny new CMD HD, would not be throwing away their 1541. Firstly, because they already have a large library of software on disk that they'll want to keep accessing. And secondly, because some fussy software would always be incompatible with newer drives. Furthermore, even if you copy less finicky software from disk to harddrive, while it may run fine from a harddrive, it will often still expect that it is running from device 8.


If you were the kind of user who was into buying harddrives for your C64, it wasn't uncommon that you would have a 1541, a CMD HD and maybe a 1581, a CMD FD or CMD RamLink too. The problem is, they all contend for device 8 when it comes to being compatible with older software. CMD's solution was to put physical buttons, Swap 8 and Swap 9, right on the front panel of their drives.2 The idea was primitive, but effective and much more convenient than DIP switches and power cycling.
You'd leave your 1541 drive (the one without any DIP switches) on device 8. Then you'd put your CMD HD maybe on device 12, and your CMD FD on device 11 or maybe 13. And if you had a RamLink, well, maybe on device 9 for GEOS, or something else, like, GoDot. If you wanted to run a game from an original disk, you simply used the 1541 as normal, on device 8. But if you wanted to run a game from the harddrive, you just push the "Swap 8" button before you start. The harddrive would automatically (though temporarily) become device 8, and it would swap positions with the 1541. The 1541 would, temporarily, become device 12.
All Commodore storage devices, and third party storage devices, can have their device number changed in software, after they've been powered up. We'll return to this to see how it works, in part 2 of this post.
It worked. The game would launch from the harddrive, and when it made its hardcoded references back to device 8, the temporarily swapped CMD HD would respond. But it was a crutch, and it depended on the user remembering whether the program needed it, and if so, doing it. This was complicated by the fact that some games would detect the device # they were booted from and continue to access their files from the boot device number. So for those programs, if you did a swap first, you were swapping for no reason and it just added an extra step. But then if you forgot that some program requires a swap, or you thought it didn't, you'd wait around for it to partially boot up, and suddenly you'd get a blinking error light on your 1541 and you'd have to reset and start everything over. There was a lot of cognitive overhead to make it all work, because there were so many variations in what programs needs or can tolerate.
Surely there must be a better way.
How does a C64 program work?
A C64 has quite limited hardware. The graphics aren't very high resolution, the sound chip has just three voices, the processor is slow and there is a very limited amount of memory, all of which is fully shared. For these reasons and more a C64 is a fundamentally single-tasking computer. Let's see what that means for programs that are loaded up and run on a C64.
Control and AbstractionA program running on the C64 has complete control of the machine. This has several implications.
The first is that a C64 program expects that it has complete control over the machine. And that it has complete control over the hardware, with absolutely zero abstraction between its own code and the hardware. A program can use the KERNAL if it chooses, which does provide some small degree of hardware abstraction, but is by no means required to.
If a program decides to set the VIC-II chip's raster registers, even though it is directly setting a register in a hardware chip at the fixed address where it is found, it also knows with complete certainty that there is no contention for the VIC-II between itself and some other program. Same goes for the SID chip, and the CIA timers, and the NMI and IRQ handlers, etc.
A program knows how fast the CPU is and how each cycle will be used. It knows how many pixels and how many raster lines there are on screen, how many bytes of memory are available and which ones are spoken for and which ones aren't. Each program is written to shape the low-level features of the hardware the same way a sculpter uses his tools to bring shape and form directly out of a slab of marble.
Security: Memory and StorageThe other side of this is that the hardware on a C64 is totally flat. The CPU has no concept of privilege levels, there is only one address and data bus that everything uses. There is no memory virtualization. There is no enforced hardware abstraction of any kind.
From the perspective of multi-tasking systems this would be bad news. Even if the KERNAL were pre-emptive, there is nothing that prevents a task from making realtime modifications to the KERNAL code. The hardware was just not designed for software compartmentalization. Additionally, there is no security on any storage devices. And there can't be, in principle, because any code can directly manipulate the CIA chip which drives the IEC bus, which can be used to make arbitrary block reads and writes to any storage device.
In today's climate you might think, holy crap, how do you prevent a malicious or errant program from stealing or destroying all your data? The answer from back in the day is quite a primitive one. There was only ever one disk in the drive at a time. When you're running some game, it is loaded from its own disk while all your other disks are sleeved and safely tucked away in a plastic disk oranizer on the shelf. As harddrives began to be used, and as SD-card-based drives are quite common today, there is indeed some risk that a malicious program (though, in practice, much more likely a program that is accidentally errant) could wipe out all your data.
Integration and TransitionLater Commodore computers, both the C128 and the Amiga, had autobooting capabilities. On these machines you could insert a disk first and then turn on the computer. The computer scans the disk, reads the autobooting information and loads and runs the disk's primary program automatically. The C64 supports autobooting from cartridge-based software. This makes the machine behave much more like a game console, like a NES, a SNES or a Sega Genesis, et al.
A relatively minor KERNAL modification could enable autobooting from disk on the C64. For example, when a CMD RamLink is plugged in, it can be configured to have the C64 autoboot a program that has to be loaded from storage first. However, this is not the out of box experience of a C64.
But if software on a C64 doesn't autoboot, and you haven't loaded any software yet, then what are you interacting with to be able to load the software you actually want to use?
The C64 has a KERNAL, which is 8 kilobytes of code fixed into a ROM chip mapped from $E000 to $FFFF. Additionally, it has the BASIC programming language and environment, which is another 8 kilobytes of code fixed into another ROM chip mapped from $A000 to $BFFF.3 When the computer starts up—much more detail on this later—the user is delivered to the READY. prompt where they can put in BASIC commands. LOAD and RUN are both basic commands that can be used directly without needing to be embedded in a BASIC program.
When you first make use of the LOAD command, it is the BASIC ROM that is parsing and interpreting what you have typed. And the BASIC routine for loading backends on the KERNAL ROM's load routine, which makes use of its IEC serial bus routines. Some programs will load a very small amount of their own code using the KERNAL's routines, and then patch the KERNAL out and use their own highly optimized load routines to read in the rest of the program. Regardless, the initial load depends upon the proper functioning of the BASIC environment. We'll come back to this in more detail in part 2.
Once you're in a program, how do you get out of it in order to get into another? Although some do, most games and programs don't actually have a quit or exit feature. When you're finished, the way you leave the program is by turning off the power to the machine. When you turn it back on, all memory contents have been expunged, and the machine is as fresh again as the first time you turned it on, ready for you to load the next program.
This leads us to another conclusion. Whenever a C64 program starts up, it expects that the configuration of the machine, including the registers of all the primary chips and the contents of main memory, but especially workspace memory, the memory below $0400, will be what they are after a fresh power up. Virtually all programs are written to modify the base machine configuration, changing only the few things they need to change. So, let's take a look at exactly what happens and how the C64 gets configured when it gets turned on.
The Power Up Process
When power is first applied, all of the C64's chips are in an unknown or inconsistent state. To be brought into a consistent state the computer needs to go through a reset. It sounds a bit strange that immediately after power up it needs to be reset, but a reset also means set, which makes a lot more sense. After a power up, everything needs to be set for the first time.
The C64's mainboard contains a small reset circuit, shown below. It consists of little more than a 556 timer with its inputs tied to +5V or ground via some resistors and capacitors. The 556's high-active output passes through an inverter before connecting to the low-active reset line. The reset line is also connected to a pull-up resistor.
When the machine is first powered on, the 556 comes awake and very shortly after, as a result of its hard-wired inputs, it fires a single momentary high output. This output gets inverted low to activate the reset line. After this momentary burst at power up, the 556 is no longer used, and for the rest of the time the machine is on, the pull-up resistor holds the reset line inactive.

The C64's reset circuit, used only at power up.
The reset line snakes around the mainboard connecting to several components. At the top of the schematic above, the line going off the left connects to the User Port's reset line, the IEC serial bus's reset line, and the 6510 CPU's reset pin. The bobble on the right side of the schematic indicates that the reset line continues on the other page of the schematics. From there it connects to the reset line on the Expansion Port, and lastly the reset pin on the SID chip. The reset line on the User and Expansion ports allows devices connected to those ports to do whatever they need to do at power up. And presumably the SID's reset line is there to silence it if it's currently making noise.
The reset line on the IEC bus signals all of the drives on the bus to reset. Each drive is a separate computer with its own power system. Therefore, it will often be the case that a drive has been on, it has been used to load a program, but then the computer gets power cycled. This does not cause the drives to power cycle, but because they get that reset signal they will jump through their own initialization procedure. On a CMD storage device, or an SD2IEC device, this means that they will take certain steps like, unmount all mounted .D64 images, unassign any assigned disk image swaplist, revert the current path of all partitions to the root directory, and revert the current partition to the drive's default partition. The error channel is cleared and replaced with a message about the drive's DOS version. Drives may also clear out certain cached data, such as the disk's BAM. And of course, all open files are automatically closed.
The way a traditional drive, such as a 1541, 1571, 1581 or a CMD drive resets is similar to how the C64 itself resets. The IEC bus's reset line connects to the reset pin on the 6502 processor in each drive. We will leave to the imagination that a similar process is going on inside each drive while I explain in more detail what happens inside the C64.
6502/6510 Reset ProcessThe 6502 is hardcoded to jump through a series of vectors found at the very end of its addressing space upon certain hardware conditions. The vectors are:
| Vector Address | Condition | Value |
|---|---|---|
| $FFFA-$FFFB | /NMI | $FE43 |
| $FFFC-$FFFD | /RESET | $FCE2 |
| $FFFE-$FFFF | /IRQ (or BRK) | $FF48 |
Each condition (except for the BRK instruction) is triggered by a physical pin on the chip. If the /NMI line is brought low, the CPU hops through the NMI vector. If /IRQ line is brought low, it jumps through the IRQ vector. And if the /RESET line is brought low, naturally, it jumps through the RESET vector. There are other associated behaviors with these conditions too but for now, we just need to know that when the reset line is brought low, the CPU reads the two bytes found in memory at addresses $FFFC and $FFFD and uses those values as the new program counter.
Aside: A brief aside before continuing, there is one other small detail that may interest the curious. The 6510 CPU has what is called the processor port. It is a set of 6 pins, directly controlled by the CPU, which are independent of the address or data buses. Three of these are used to operate the cassette port, and the other three are used to configure the PLA, which in turn controls which chips will be mapped into certain address ranges which are overloaded with more than one function. I covered this in much more detail in an earlier post, The 6510 Processor Port.
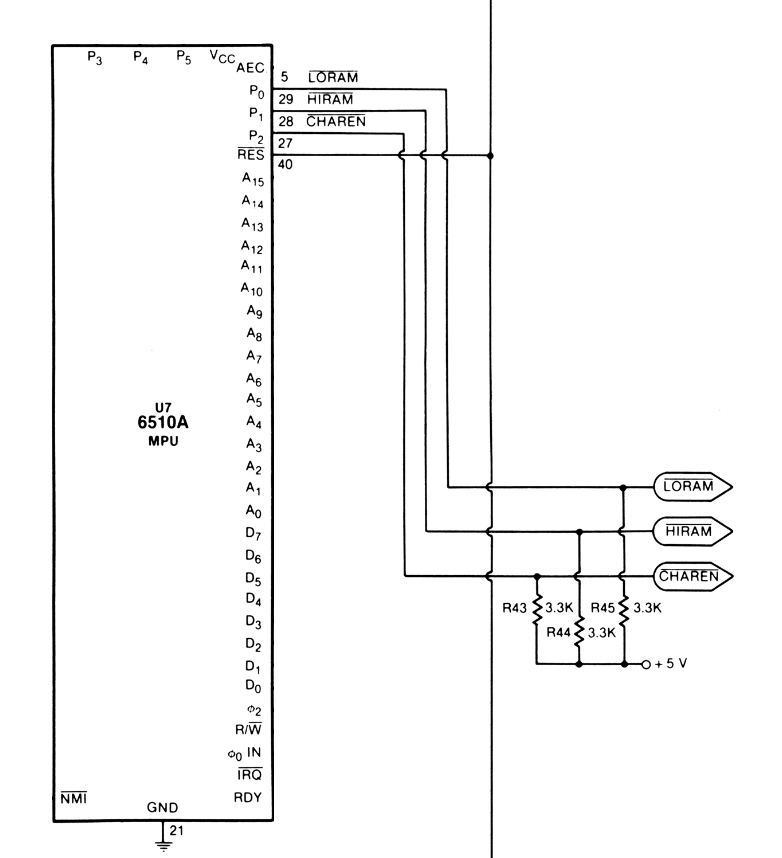
Here we see the 6510 CPU. Much detail of its other connections has been removed for clarity of focus. You can see the reset line, and you can also see that the low three bits of the processor port are connected to the little bobbles which, on the other page of the schematic, are connected to the PLA. In my post on the 6510 processor port, I was confused about why these lines need to have pull-up resistors. Here's what I wrote in that post:
It may seem a bit strange to see these here, though, because these lines are hard-wired to the CPU's port. Why would they need pull-ups?
I'm going out on a limb here to guess that they handle the situation (the useless situation?) where someone sets the 6510's data direction register to make these three bits inputs rather than outputs. If these 3 bits were set as inputs, the pull-ups would kick in, deactivating LORAM, HIRAM and CHAREN, and simultaneously causing those input bits on the CPU's data register to read as high. Greg Nacu — The 6510 Processor Port — 2019
Sometime between then and now, I read about this and the minor mystery has been solved. I mentioned that each of the conditions above, (NMI, IRQ, RESET,) comes with additional associated behaviors. One behavior of RESET is that all 6 bits of the processor port are reverted to their default as inputs. My guess was not a bad guess, I just couldn't imagine why a programmer would intentionally set these to be inputs, as it wouldn't serve any purpose. It never occurred to me that this might happen automatically as some default behavior of the 6510. The pull-ups therefore serve the critical function of supplying valid inputs to the PLA when the CPU is reset.
There is one more upshot to this. When the reset line is activated, the 6510 gets reset. When the 6510 gets reset it reverts its processor port to all inputs. When the processor port becomes all inputs, the pull-ups kick in and provide default values for /LORAM, /HIRAM and /CHAREN. Each of these values goes high, which causes the PLA to automatically map I/O, the KERNAL ROM, and the BASIC ROM back into the memory map. Only then does it proceed to read in the RESET vector. Therefore, as far as I can tell, the RAM found at the address of the RESET vector ($FFFC/$FFFD) isn't ever used, which means you can probably safely cram something of your own in there. Neat.
On a C64, then, it is not a surprise why the KERNAL ROM sits at the top of memory. The KERNAL ROM runs from $E000 to $FFFF, which means its last 6 bytes direct where the CPU goes to handle these various conditions. It is also not a surprise to see that the values of each of these vectors are addresses found elsewhere within the KERNAL ROM. A reset will take the CPU to the routine in the KERNAL ROM at $FCE2.
Let's take a look at the fully commented KERNAL ROM disassembly to see what happens next.
.,FCE2 A2 FF       LDX #$FF        Set X for stack
.,FCE4 78          SEI             Disable the interrupts
.,FCE5 9A          TXS             Clear stack
.,FCE6 D8          CLD             Clear decimal mode
.,FCE7 20 02 FD    JSR $FD02       Scan for autostart ROM at $8000
.,FCEA D0 03       BNE $FCEF       If not there continue startup
.,FCEC 6C 00 80    JMP ($8000)     Else call ROM start code
.,FCEF 8E 16 D0    STX $D016       Read the horizontal fine scroll and control register

.,FCF2 20 A3 FD    JSR $FDA3       Initialise SID, CIA and IRQ
.,FCF5 20 50 FD    JSR $FD50       RAM test and find RAM end
.,FCF8 20 15 FD    JSR $FD15       Restore default I/O vectors
.,FCFB 20 5B FF    JSR $FF5B       Initialise VIC and screen editor

.,FCFE 58          CLI             Enable the interrupts
.,FCFF 6C 00 A0    JMP ($A000)     Execute BASIC
I find this stuff deeply fascinating. For instance, just because the CPU gets reset, that evidently doesn't affect its current stack pointer. The first thing this routine does is resets the stack pointer back to #$FF. It also clears the very infrequently used decimal mode.
Earlier I mentioned that the C64 supports autobooting cartridge-based software. Here is exactly the implementation within the KERNAL that makes that possible. It calls a routine at $FD02 that will check for a special signature ("CBM80") that an autobooting cartridge maps into memory from $8004 to $8008. If the signature is found, the KERNAL jumps through a vector the cartridge provides at $8000/$8001 and the KERNAL's job is over. At that point it's up to the cartridge to decide what to do next.
If there is no cartridge, though, or if the cartridge is not autobooting, the KERNAL proceeds and performs 4 major steps, before passing the reins of control over to BASIC.
- Initialize SID, CIA and IRQ
- Test and Initialize RAM
- Restore Default I/O Vectors
- Initialize VIC and Screen Editor
Each one of these steps is exposed independently via the KERNAL's jump table. The four stages above are the equivalent of the following four KERNAL calls:
- IOINIT
- RAMTAS
- RESTOR
- CINT
However, the reset routine jumps directly to their code, rather than going through the jump table. You can read more about these in my C64 KERNAL ROM: Making Sense, technical reference post.
Let's walk through these steps and see what happens.
Initialize SID, CIA and IRQ (IOINIT, $FDA3)
This stage is fairly self-explanatory. CIA 1 is responsible for generating the system's main IRQ, and for scanning the keyboard. It is thus reconfigured to do those things.
CIA 2 controls RS-232 over the User Port, controls which memory bank the VIC-II sees, and also controls the IEC serial bus. It is thus reconfigured to handle those things.
The 6510's processor port has its data direction set, and its output values are set to stop the cassette drive and take over configuration of the PLA from those pull-up resistors.
Next, the PAL/NTSC flag is read from $02A6, and used to set the appropriate IRQ timer delay in CIA 1. In every post where I'm learning stuff for the first time, I usually stumble upon a minor mystery. In this case, $02A6 is configured by testing the VIC-II to determine if the computer is PAL or NTSC. Various other time-sensitive routines later reference it. For example, RS-232 is highly time sensitive, and those routines use $02A6 to select the correct timer values. What doesn't seem to make sense is that $02A6 only gets set when the VIC is initialized. But if this is a fresh power on, then that is a step the computer hasn't gone through yet. At this stage $02A6 should hold some garbage value.
Lastly, the IEC serial bus's clock out is pulled low and that is the end of this stage.
Test and Initialize RAM (RAMTAS, $FD50)
This stage has fewer components to deal with—only RAM—but it has a few interesting tidbits we should know about.
The first thing that happens is that all of memory pages $00, $02 and $03 are cleared, set all to zeros. The stack (page $01) is not cleared, although, as we saw already, the stack pointer has been set back to $FF. This has implications for testing etc. If your code crashes and you do a reset and then go into a machine language monitor to inspect memory, inspecting anything below page $04 is a complete waste of time, because the reset explicitly clears all this memory.
The pointer to the cassette buffer is configured to a hardcoded address in page $03.
Next, starting at page $04, every bit of memory is tested. Note, not just every byte, but every bit. It does this by reading the current byte from an address and stashing it in the X register. Then writing a $55, which is the bit pattern 01 01 01 01. It then compares to confirm that that address now holds a $55. To complete the test of that address it rolls the $55 left, which gives the bit pattern 10 10 10 10, and writes that to the address and compares to confirm. This tests each bit at that address. If it fails, the testing loop ends. It has either found a bad RAM chip or it has found an address where no RAM is present, or, usually what happens in a functioning C64 is that it reaches the address where the BASIC ROM is patched in. The write technically succeeds, but the read comes from the ROM chip, which tells the routine that it has reached the end of usable RAM.
After every successful test of an address, the original value is restored from the backup that was made to the X register. Except for at address $A000. It looks like it will write the first test byte to $A000, read back a byte from the BASIC ROM, notice that they are different, and then quit the testing loop leaving the test value of $55 at $A000.
The highest address of usable RAM is then saved to BASIC's top of memory pointer. This is pretty cool. If a RAM chip is detected as bad at some midrange address, the C64 might actually still boot up and work, but the number of bytes free memory on the title screen should be different than the usual. I wonder if this has ever been observed before.
The bottom of BASIC memory is configured in a pointer as $0800, and the start of screen memory is configured in a pointer as $0400. And that's everything for this stage.
Side Note: I got curious about that $A000 ram test issue. So I tried it on my C128. The first screenshot below, on the left, shows that in a machine language monitor I wrote a value of $81 to $A000. To see RAM at $A000 you have to patch out the BASIC ROM, which you can see just above, the $76 at $0001 makes the BASIC ROM be patched out.
Next I just pushed the reset button on the C128, and then immediately loaded the machine language monitor again. The monitor loads from $C000 up. After patching out the BASIC ROM again, and then checking the contents of $A000, sure enough, the $81 I put there has been clobbered by $55, the first stage of the 2-stage memory test that failed, ending the general RAM test.
I'm a subscriber to the FREEZE64 fanzine. In many issues Vinny talks about how you can use a reset button to drop back to BASIC, then enter a few prized POKEs to help you out in those tricky parts, and then jump back into the game with a SYS. It occurs to me that if a critical byte of the code resides precisely at $A000, after the reset this byte will be changed and could lead to a crash or some other unexpected behavior.


Restore Default I/O Vectors (RESTOR, $FD15)
There is another KERNAL call, VECTOR, which allows you to backup the system vectors, or overwrite them from a table you point to. Whether you're backing up or overwriting is specified with the carry. Set the carry to backup the current vectors, clear the carry to overwrite the vectors.
The RESTOR routine itself is very short. It sets a pointer to the default vector table found in the KERNAL ROM, clears the carry, and the falls through into the VECTOR routine. It merely transfers 32 bytes (16 vectors) from the default vector table to the set of RAM vectors found starting at $0314.
Many other KERNAL jump table entries route their calls through this RAM vector table. That's all there is to this stage.
Initialize VIC and Screen Editor (CINT, $FF5B)
This routine is quite involved.
First it configures the screen (Device 3) as the current output device. And the keyboard (Device 0) as the current input device. I have thought this is super cool ever since I learned about it.
The philosophy of the Commodore 8-bit KERNAL is that there is a series of numbered input and output devices. One input and one output device are assigned at a time. Data is read from the input device and streamed to the output device. By default, such as after a reset, the keyboard is assigned as the input device and the screen the output device, this explains why after turning on a Commodore 8-bit machine, buttons pressed on the keyboard result in characters appearing on the screen. That's very clever.
Next, all of the VIC-II's default register values are read from a table in the KERNAL ROM and simply written in a loop to the VIC-II's actual registers, all 47 of them. This does things like turn off the sprites, set character mode, configure where to find the character set data, and so on.
Then numerous properties are configured, such as configuring the keyboard buffer, and pointers to the keyboard decoding tables, setting cursor properties such as its position, blink, repeat and default color values. Screen memory is cleared, and the logical linked-line table is cleared.
Finally we get to the code that calculates whether this is a PAL or NTSC machine. The VIC-II register initialization above sets the interrupt raster matching number to 311. Only a PAL VIC-II will ever reach a raster line that high. NTSC machines don't exceed raster line 262. It dead loops until the raster register reads as zero. Then it checks the interrupt register and clears all the bits except b0, which is the raster line matching interrupt flag. The result is written directly to $02A6. If the value is 1, we know it's a PAL machine, because we know the VIC-II reached a high PAL-only raster line which is what raised the interrupt flag. Again, clever.
I asked around on Twitter about this, and while this simple test works well enough for the timing routines used by the KERNAL, it's apparently not sophisticated enough to do proper timing for highly time-sensitive effects in games and demos. So, they usually reimplement some other PAL/NTSC testing routine.
And the very last step of this stage is… oh… wait for it. It jumps back to $FDDD. Where is $FDDD? It's the tail end of the first stage, Initialize SID, CIA and IRQ (IOINIT)! Remember how I said it didn't make any sense to read from $02A6, because at that point the PAL/NTSC detection hadn't yet been performed and that it should just contain a garbage value? As it turns out, after a fresh power up, it really does just contain garbage. Which is why in this routine, after doing the PAL/NTSC test it jumps back and runs that little snippet again this time setting CIA 1's timer to the correct value. Mystery solved.
You might wonder, well, why does IOINIT even bother to set CIA 1's timers, if the PAL/NTSC flag isn't set properly yet? The reason is because IOINIT can be called at any time, and it's only not set the first time around, immediately after a fresh power up. Forever after that, unless someone has changed the value in $02A6, it's valid. C64 OS, for example, reserves $02A6 to serve as the PAL/NTSC flag for whatever application, utility, library or driver may need to use it.
With the end of the last of the four stages, that is the end of the reset routine too. It unmasks interrupts, which had been masked throughout most of the reset process, and then it passes control to BASIC with a JMP ($A000), which is the vector to cold start BASIC, found at the start of the BASIC ROM. BASIC's cold start proceeds to configure many more vectors, and workspace memory variables, which we don't have time to go into here.
Any given C64 program out there depends, more or less, on everything above being configured as it is. If anything described above is not set as it should be, it is impossible to predict how a program might fail.
How a Program Starts Up
Once we're at the READY. prompt, there are several ways that a program can be started.
We already saw how a game disk's label, or its user manual, provides the command to type in to load this game. But, what actually happens when we follow those instructions? Well, let's look at the parts of the LOAD command.
load "my game",8,1
The LOAD command is a BASIC keyword. Upon pushing return on that line, BASIC, in direct mode, begins parsing the data. It expects either a variable assignment or a command keyword to be found. If it doesn't find one of these it throws a syntax error. As soon as it identifies the command as LOAD, it jumps into one of its own routines that processes the arguments that it expects must follow. In fact, on the stock KERNAL, all 3 arguments are optional. If the LOAD command is issued alone, it begins trying to load the first program found, with any name, from the Datasette, (device 1.) Considering that the Datasette predates the disk drives, this made loading software on a Commodore 8-bit even easier. Just one word, LOAD.
The very popular KERNAL replacement, JiffyDOS, exchanges support for the Datasette with its own additional functionality. JiffyDOS introduces the concept of a current storage device #, and requires that a filename be provided. Issuing LOAD without a filename results in a MISSING FILE NAME error.
Note that this command is being interpreted by BASIC, so the filename does not have to be a string literal (a fixed set of characters between quote marks), it can also be a variable. For example, the following does exactly the same thing as the above example.
f$="my game"
load f$,8,1
It must be a string variable, of course. If you attempt to provide the LOAD command's first argument with anything other than a string literal or a string variable, you will get a TYPE MISMATCH error.
The arguments are separated by commas. The second argument is the device number. If this is omitted on a stock KERNAL, device 1 is assumed, the Datasette. JiffyDOS will instead use the current storage device #, which is autodetected or can be set in a few different ways. The device # argument can also be supplied in a numeric variable. For example:
f$="my game"
dv=8
load f$,dv,1
Up to now, almost everyone who has ever used a C64 knows this much. But exactly what the role of the 3rd argument is starts to become arcane knowledge. Many people whom I've spoken with, who use a C64, are not entirely clear what the point of the extra ,1 is. I've even heard someone, who should know better, mistakenly think it has something to do with selecting internal mechanisms inside the floppy drive. This is not true, that's something else entirely. Some people seem to use the ,1 reflexively assuming that it's always necessary.
It all comes down to where in memory a program should be put as it gets read in from storage. The default behavior is to load the program starting at $0801. This is the start address for all BASIC programs… on the C64. But this is not the start address of a BASIC program on the PET. On a PET, the start address is $0401. BASIC code, however, can easily be relocated.
All PRG-type files, on disk, begin with a 2-byte header which is not part of the data that will be loaded into memory. The 2 bytes specify the start address of where this program should be loaded to in memory. Create a BASIC program on a C64, and save it to disk:
10 print "hello world"
20 goto 10

save "hello world",8
The first two bytes of the file "hello world" on disk will be $01,$08 (to form the address $0801.) The default behavior of the LOAD command, without the 3rd argument specified, is to automatically load the program to $0801. For C64 BASIC programs that is correct. If on the other hand you include the ,1 at the end it will not automatically load to $0801, it will read the 2-byte header from the file and load it to there. But, in a C64 BASIC program the 2-byte header already is $0801, so it is perfectly okay to do that, and in fact the result is exactly identical.
If the BASIC program originated on a PET, and you try to load it on a C64 and you omit the ,1 it will be relocated automatically to $0801 and it will run on a C64 (assuming it only uses the BASIC commands available to the C64's BASIC 2.0, and assuming it doesn't make other assumptions about the machine its running on and try to poke data directly into incompatible registers.)
There is a problem though. If you try to load a PET BASIC program on a C64 and you include the ,1 it will read the header from the file and try to load it to $0401. This will not work on a C64. Therefore, for BASIC programs, it is actually safer to omit the ,1 and let the computer decide whence to relocate the program. This is really the original point.
However, there are two main types of program on the C64: BASIC and Assembly Language. If a program is written in pure assembly language, with no BASIC whatsoever, that program could be assembled to nearly anywhere. For example, many machine language monitors are assembled to $C000, a common place to stick small assembly programs. It's 4K of space, between the BASIC ROM and the I/O address range, and it's never touched by BASIC.
Such a program will have a 2-byte file header $00,$C0. If you load this program without the ,1 it will be relocated to $0801. This will never work, if you try to list it like a BASIC program a bunch of junk will get printed out. If you type RUN you'll either get an error or the computer will crash in some unpredictable way. The only way to run a program like this is to load it with the ,1. That will supress any automatic relocation to $0801. The header will be read and used, and the program code, in this case, will be correctly loaded to $C000. However, typing RUN will not magically jump to $C000. On the stock KERNAL there is no way to know where this program actually got loaded to! You simply have to know where it went (perhaps by reading the documentation or user manual that came with it), and then use the BASIC SYS command with the address of the assembly program to start it running.
$C000 in decimal is 49152 (or 4096*12 if that's easier to remember.) Thus, you run this program by issuing the following commands:
load "my monitor",8,1
sys 49152
Okay, I don't know if you've noticed, but this is suddenly no longer easy. What if the program isn't assembled to $C000 but to $6000? Well, in that case you load it the same, but the only way to start it is with SYS 24576. The stock KERNAL does not tell you where it went! JiffyDOS improves upon this situation quite nicely. It provides two DOS Wedge commands, % and £. The first performs exactly the same role as a LOAD with the extra ,1 argument, and is merely a convenient shortcut. Like this:
% "my monitor"
sys 49152
Note also that, because we don't need to include ,1 argument, we can also leave off the device # argument and JiffyDOS will use the current storage device #. However, it still doesn't tell us where it loaded it to, and we still need to SYS to its address. This is where £ really shines.
£ "my monitor"
This will load the program whence it should be loaded, $6000, $8000, $C000, wherever, and it will also SYS directly to that address automatically. Very convenient. But only usable if you have JiffyDOS or some other KERNAL replacement that implements the same command. I think the IDEDOS implements this command as well.
Hybrid BASIC/Assembly Programs
Usually it is only tools or special utilities that are assembled to some high address, and require you to SYS to get there. But not always. Certainly not always. I have a copy of the game Hat Trick, and it loads to $0400, and you cannot simply load it with either the ,1 or omitting the ,1. The only way I know to load it is with the JiffyDOS £. This is highly unusual though, for a game. In all likelihood this game originally had an intermediate boot program, but my copy is missing that boot program.
It is far more common for a game to be a hybrid. Mostly written in assembly but with a small BASIC program that prepends it. The technique is to create a BASIC program that has just a single line, that has just a SYS command, which directs to an address that immediately follows the end of the BASIC program. This program can then be embedded into the start of the assembly program, and the whole thing can have a load header of $0801.
For all games and programs of this type, whether you use the ,1 or not is irrelevant, because the 2-byte header is the same as where it will be automatically loaded to if the ,1 is omitted. The BASIC program segment ends up in the proper place for BASIC programs, and the rest of the program loads to where it was assembled to. If you list such a program, this is all you see:
load "my game",8
list

10 SYS 2061
Or something similar to that. In this case, the assembly component of the program has been designed to run from $080D, and the length of the BASIC pre-run fits between $0801 and $080C. These programs are very common. It doesn't matter if you use the ,1 or not, and after it's loaded you don't need any special knowledge, you can just type run. BUT, but, this is still not a panacea. If you load such a program with the JiffyDOS £ command, it will load the program to the correct place in memory, but it won't issue a RUN, which tells the BASIC interpreter to start interpreting the code at $0801. Instead it will try to SYS to $0801, which would only work if assembled code appeared there. For these programs, using the £ command will totally not work, it will almost certainly crash the computer.
No matter what, there is no single command which will universally and invariably work. Let's look at one more trick, before moving on.
Auto-running Programs
There are some programs which must be loaded with the ,1 but shortly after they begin loading they automatically run themselves. How does that work?
I can't recall now who pointed this out to me, I think it might have been Kroc Camen. As we saw in the reset procedure earlier, the KERNAL vectors are written into RAM. They are written into memory starting at $0314. If you assemble your program to $0314, then as the KERNAL begins to load it in, only if you use ,1 your program itself will overwrite the RAM vectors. At a certain point, after the load is complete, the KERNAL will automatically jump through one of those vectors, to close the file, for example. This allows you to redirect that vector to your own code that was just loaded. Your code can then do whatever the vector was supposed to point to, but then, instead of returning, simply carry on running your program. Bingo, your program is auto-running.
Frankly, this feels like an insane hack. Nonetheless, many games written throughout the history of the Commodore 64 use this trick or some close parallel to it.
These programs will not work at all, however, if you omit the ,1. Without the ,1 these programs will be relocated to $0801 and they just weren't designed to run from there.
We can see now why many users reflexively include the ,1. The ,1 is necessary for all those auto-running programs. Plus, it won't break any program that is designed to load to $0801 either because it is a C64 BASIC program, or because it is a hybrid with a BASIC starter program. It will also work to load a program designed to be loaded to somewhere like $C000, even if it doesn't help you run that program.
In fact, the only program that would run fine without the ,1 but would fail to run with the ,1 is a BASIC program that was written and saved on a non-C64, such as a VIC-20 or a PET. And, well, let's be honest, there can't be very many of those floating around. And they can be fixed simply by loading them once on a C64 and then resaving them on a C64. It seriously makes you wonder why Commodore decided on what the ,1 should actually do. It feels like the ,1 should force the redirect, and then it would only be necessary when loading a PET BASIC program on a C64. And in all other cases you could just ignore and forget that the ,1 even exists. Instead, the ,1 supresses the redirect, and you are almost always safe to it.
Wrapping up part 1
We're over 10,000 words in now. This is a good point to stop, and leave the remainder of this discussion for part 2.
We now know a bit of the history of where the C64 started, loading games and other commercial software from floppy disk, usually with just one disk drive. We know about device numbers, and that those of us who stuck with a C64—into its late life and afterlife—have ended up with a wide array of hardware occupying many device numbers. The C64 is a fundamentally single-tasking machine, and software expects that it controls the whole machine. We took a detour into how the machine is configured after a fresh power up, or as we'll see a hard or soft reset.
The powerup/reset procedure will become more relevant in part 2, when we look at how to return the C64 to a state that is ready to run most software, but without losing our control over the machine and finding ourselves back at a READY. prompt. And lastly, we looked at why it is that C64 software can't all be loaded and run using a single consistent command.
Part 2 goes into exactly what all of the problems facing a consistent load and run experience is for software on a C64, similar problems that exist on other platforms and how they have been addressed there. Lastly, we'll dig into some programming details on how to solve this problem on the C64. And what specific implementations C64 OS offers to allow it to launch directly into regular C64 games and programs in such a way that those programs will actually run correctly and as expected.
- Here's the Wikipedia article on the IEC bus and device numbering.
- The CMD FD, which I think is the oldest of the three, only had a single swap button, but the principle is the same.
- Actually the KERNAL takes up around 7.5K, and BASIC takes up around 8.5K. Around half a kilobyte of BASIC spills into the bottom of the KERNAL ROM chip. But generally speaking, we say, here's the KERNAL ROM and here's the BASIC ROM.
Do you like what you see?
You've just read one of my high-quality, long-form, weblog posts, for free! First, thank you for your interest, it makes producing this content feel worthwhile. I love to hear your input and feedback in the forums below. And I do my best to answer every question.
I'm creating C64 OS and documenting my progress along the way, to give something to you and contribute to the Commodore community. Please consider purchasing one of the items I am currently offering or making a small donation, to help me continue to bring you updates, in-depth technical discussions and programming reference. Your generous support is greatly appreciated.
Greg Naçu — C64OS.com


