
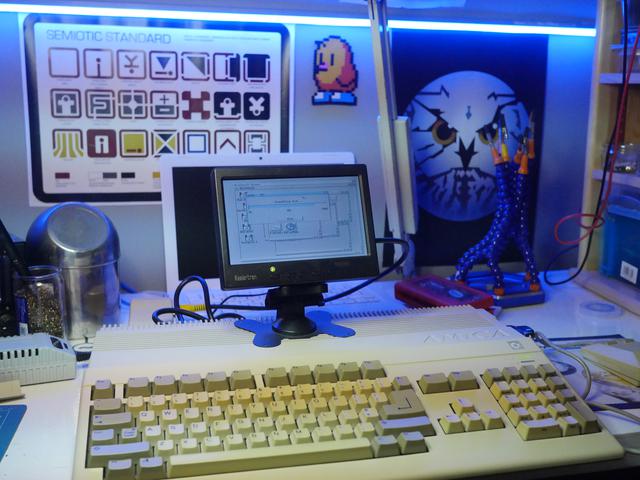
Much like the Sinclair ZX Spectrum I fixed up, the Amiga has a special place in my heart. I'm not alone in this, by a long way. For folks who were into computers in the late 80s / early 90s, the Amiga was one of the most interesting. Much ink has been spilled on why this particular computer is so special. Jimmy Maher in his book, The Future was Here makes the claim that the Amiga was the first multimedia machine. I think that's a fair assessment. It could draw amazing graphics, play great sound, run great games, desktop applications, paint packages - the whole sheebang!
Folks like Ahoy, Kim Justice and many other folks have done some pretty good videos on the history of the Amiga, so I won't go into too much detail here. Suffice it to say, the Amiga has it's time but was hampered by poor business decisions and a hardware design that didn't evolve enough. Nevertheless, there are some folks like Steve Lord who have attempted to use their Amigas for modern day tasks, replacing things such as IRC, email and playing music. This might seem crazy but Amigas don't have the same problems modern PCs do. While you might spend time and money to update a 30 year old machine to work in the modern day, you'll never have to worry about spyware, ads, lag or malware (for the most part).
I had an A500 back in the day - one of the most popular models in the UK. It came in the Cartoon Classics Pack - bundled with some software such as Deluxe Paint, Bart Versus the Space Mutants, Lemmings and, unfortunately, Captain Planet. I loved it though and I have a lot of nostalgia for it. Sadly, I sold mine back in the day. I never thought I'd miss it.
I bought another on eBay and decided I'd like to upgrade it for the modern day. Some things about the original Amiga were annoying - such as the disk loading. But these were problems of the time and not limited to the Amiga alone. We can get around these rough edges today and get the best of both worlds.
The first thing to do is to clean this machine. It's definitely yellowed a lot! I don't intend to retrobrite this Amiga; I'm told that retrobriting doesn't last very long, and besides, even though I live in Fife (the sunniest part of mainland Scotland), retrobriting would take forever! So I figure just a quick clean with detergent and car shampoo to get rid of all the grease and dirt should do it.
The plastic on old computers can be quite brittle so it's important to take care when taking such things apart. I cracked part of the top case sadly. I managed to fix it with a little plastic weld, which worked a treat. You can barely notice the join. The next challenge is removing the keys from the keyboard. Most are quite easy with the proper key-puller, but the larger keys have a metal bar holding the key to the board. You have to pop and slide the key cap to get it off. This is tricky with the space bar, having the longest metal rod of all, but the worst is the return key. This has two metal bars mounted perpendicular to each other. A real pain to deal with!
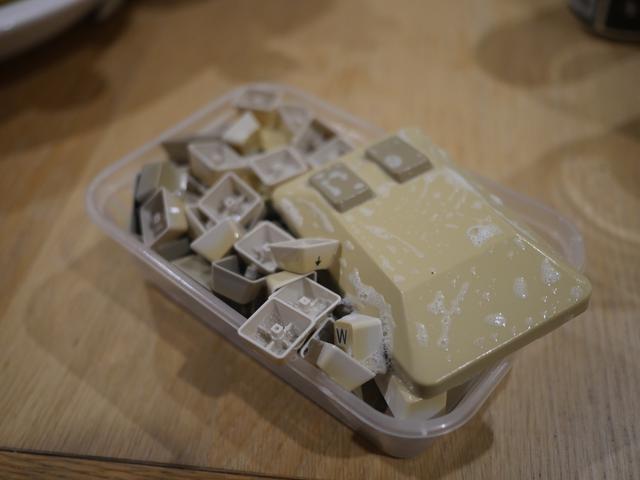
Wet wipes took care of the gunk and gunge on the keyboard proper. A good scrub with a toothbrush and cream cleaner made short work of the case. Sadly, I lost the warranty void and factory stickers in the process which was a shame. I tried to remove them and failed. I probably could have left them on during cleaning as they were pretty firmly fastened to the plastic. Oh well.
The motherboard was quite clean, with no signs of corrosion or leaky capacitors, which was good to see. I did buy an A500 as a present for my sister some time back that did let out the magic smoke when it was plugged in, so it's always good to check these things.
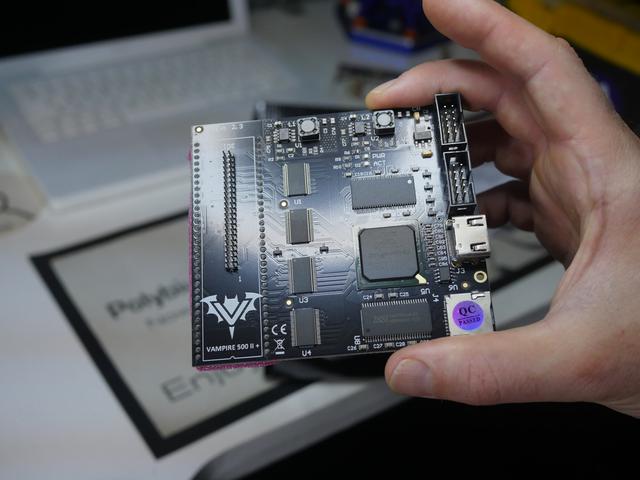
There are several ways to upgrade the core of an Amiga these days. The PiStorm is the latest craze I believe? There are flicker fixers, Wichers and a host of other options but I went for the Apollo Vampire A500 V2. It does an awful lot of stuff! Not only does it replace the CPU, but it replaces the ROM, adds compact flash and SD card support, HDMI out and loads of extra memory! It's an incredible bit of kit, but one needs to sign up to to a waiting list in order to get one.
Installing it is super simple. You need to remove the original CPU and ROM chips. I used a chip pulling tool and a flat bladed screwdriver. If you are using the latter, be aware this is not the best method; it can cause damage to the legs of the chip. I tend to twist the blade slightly, then move to the other side, or other end of the chip and repeat. I only lever at the end when it's almost out. Seems to work well.
The Vampire needs to be firmly pressed into place. Once it's in you can lead out your HDMI cable if you want. I'm not using HDMI on this Amiga, at least not yet, so all I need to add is the compact flash.
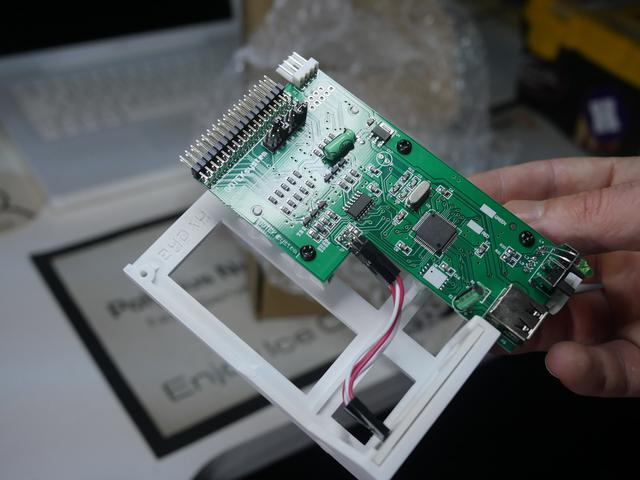
Hard-disks for the Amiga seemed super rare to me, in 1990s UK. They were huge, and slotted into the side expansion port. These days, we have more storage than we know what to do with, so we can have the hard-disk of my dreams using the Vampire's IDE pins and a compact flash adaptor. Firstly though, we need a cable.
I thought I had the right cable - I have a load of IDE cables knocking around. However, the cable I needed was a 44pin laptop IDE cable. Such a cable has 4 more wires and a smaller pin pitch. Oh well. I found one on ebay eventually, along with a compact flash to IDE adaptor. The adaptors were quite easy to find but the cables seemed quite rare. Very odd.
The whole thing sits on-top of the vampire card. I put the assembly inside a small plastic bag in order to stop any bare metal parts touching. The whole thing sits nicely under the RF shield. It does mean swapping out the card is a pain; one needs to undo the entire case. It can be handy to install directly onto the card from WinUAE or similar. However, it'll do for now. If I find a longer cable, I might use the side door expansion and find a way to mount the adaptor just above the old edge connector.
The A500 predominantly uses 3.5 inch floppy disks. Yep! For you young'uns out there, this is what the 'save icon' is based on. Each would hold 880K (this was the case on the Amiga. Similar disks on later machines would hold a bit more). Some games would come on many disks and swapping them in and out was a bit of a pain
I never had access to a hard-drive back in the day, or even a second floppy disk drive. Disk swapping was not a fun part of the experience. I'm not aiming for reliving the Amiga days 100%. Rather I'm trying to keep the good whilst getting rid of the bad. While disk swapping and the glorious noise the drive made are part of the authentic experience, I'm happy to let this bit go.
I decided to buy a Gotek USB floppy drive emulator. This lovely bit of kit allows you to use a USB stick, loaded with disk images, instead of the original Amiga floppy drive. All you need to do is unplug the Amiga drive and replace it with this. Find a USB stick, format it with FAT32, copy over some adf disk images and pow! No more disk worries!
This Gotek has a 3D printed frame for easy installation, two buttons to scroll back and forth and a little display showing which adf is currently loaded. Once a disk is selected, you just have to wait for a couple of seconds and the drive will load.
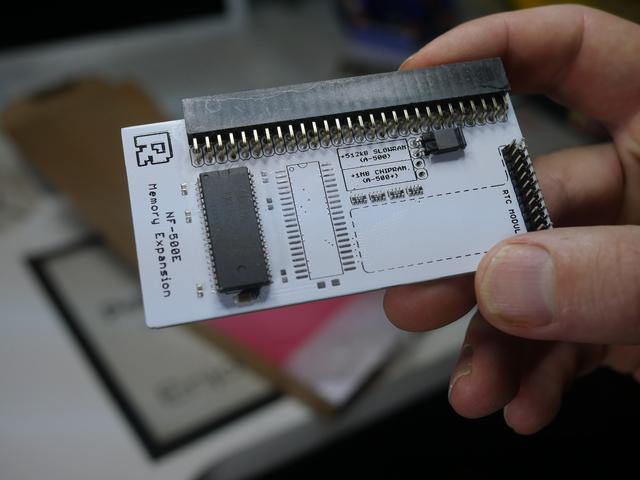
My Amiga is a Revision 6 - one of the later ones, which I think was made in Germany, judging by the stickers I found. It means I have an Extended Chipset (ECS) Agnus. Sounds odd, but most of the important chips in the Amiga had names. Agnus contained the famous 'Copper' and 'Blitter' but also looked after the Memory. Having an ECS Agnus means I can get access to a 512K (wow!) memory upgrade in the form of a trapdoor expansion card.
However, there is a catch. I need to cut a trace and solder a couple of pads. Near the CPU is a jumper labelled JP2. This consists of three pads. The bottom two pads are connected by a trace. This needs to be cut. Once done, the top two pads need to be soldered together.
I managed to find a RAM expansion on eBay for not a lot of money. This one has a setting for either an A500 or A500+. However, if set to A500, this RAM appears as Slow RAM. Not a lot of use. I needed to solder on a couple of pins and move the jumper to the A500+ setting in order to get this expansion to appear as Chip RAM.
RAM in the Amiga was never so straight forward (though it probably isn't in modern machines either when you really get down to it). Chip RAM is used by all the custom chips but only by one at once. Slow RAM sits on the bus and is used by the CPU only. Fast RAM also appeared in some Amigas and could be accessed by multiple chips at once, but not by the Agnus/Alice chip. Confused? Well, some things come back around. Today we have levels of cache, main memory, GPU memory and such. Not so different I feel.
1 Megabyte of chip RAM is pretty much seen as the standard for A500 use. Lots of games and demos assumed this to be the default, so I'm pretty glad I got this working.
I've since learned it's possible to get a real-time clock and memory upgrade combined on some trapdoor expansion cards. I feel like that would have been a better move potentially. If I upgrade another Amiga, that's what I'll go for.
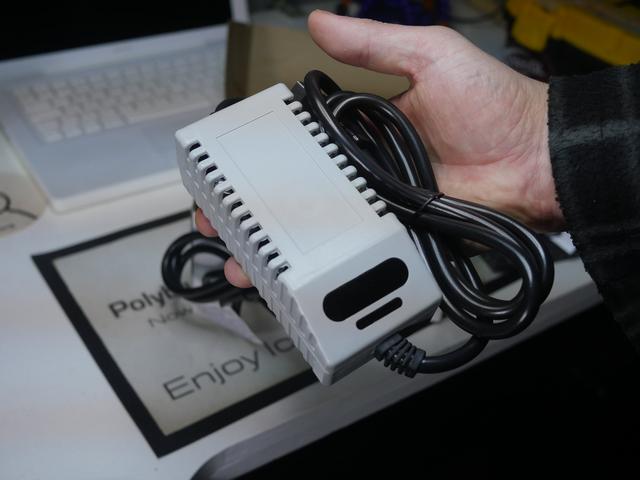
The original power supply is a brick. No really. People use that term a lot these days for things that really aren't anywhere near as large or as heavy as a real house brick. At the risk of sounding like a proper old man, kids don't know what they have these days! The Amiga PSU is mahoosive! I believe it's filled with resin in order to soak up all the heat it generates (that could have been the C64 power supply I'm getting confused with - maybe both were like that?).
Something more efficient, smaller and neater is needed I think. Turns out there is such a thing over at Keelog. I think I bought mine from eBay in the end but either way, it wasn't too expensive and works a treat! Saves a lot of space and heat in the final install.
With all the new parts installed I decided to give the machine a quick test before I assembled it fully. Surprisingly it worked first time! I proceeded to put the case back together, only having slight trouble with the Gotek. It takes a bit of tension to get the gotek to sit right so that the top shell closes nicely. The biggest problem was re-attaching the return key! It has two metal bars, perpendicular to each other, that need to be slotted in behind the key. A real pain to get right!
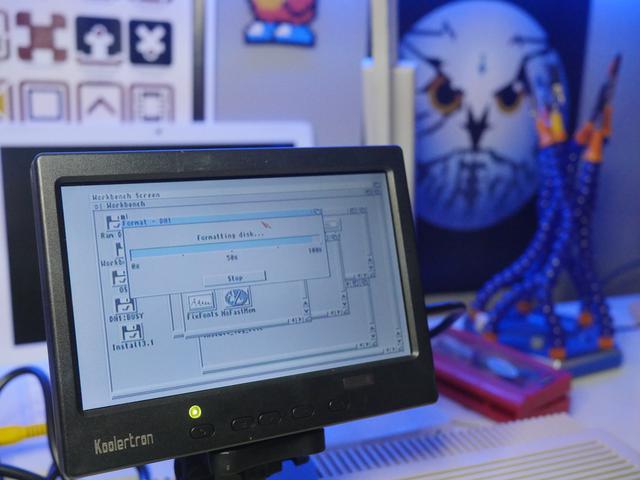
Once it was all back together, I figured I needed to get the hard-disk working. I loaded up Workbench 3.1 from an ADF file using the Gotek and noticed it had all the software to partition and format my hard-disk. Looking around online there are options for fancy, new modern file-systems but I went with the defaults as I didn't want to mess around with anything too new just yet. Once partitioned and formatted, there is an installer on a second workbench ADF that will install workbench to your hard-disk and set it as the default boot option. Pretty easy, all things considered. This does mean we don't get the nice animated disk boot screen but never-mind - the speed of the hard-disk is totally worth it!
I needed to check the Chip Memory modification had worked. To do that, I used sysinfo. One simply downloads the ADF, puts it on the USB stick and boots it with the Gotek. Sysinfo will do all the benchmarking and checks you might want. I managed to find out that indeed, my memory upgrade had worked. Brilliant!
Some games came with the 'install to hard-disk' option back in the day. So far, I've got Dune 2, The Settlers, Eye of the Beholder 2 and, of course, Frontier Elite 2 installed on there. I was a big fan of these games back in the day, so it's great to see them again.
There are many games that don't have a hard-disk option as standard. A program called WHDLoad takes care of many of them for you. I'm not totally up on how this program works or is installed. Nevertheless I'll be giving it a go in the future.
I'm debating hooking this up to the internet using something like a plipbox. There is also the option of a real-time clock along with using the Vampire's HDMI output. There are many programs I've yet to setup, like Deluxe Paint, Pro-tracker and the like. There are plenty of demos to watch and lots of new games people have made recently. Lots to try! Oddly, workbench 3.1 doesn't have the 'Say' program which is a shame. Some folks may have spotted that my video intro on YouTube uses Say.
All that said though, the setup I have, with the old Sony Monitor and a handful of games is quite nice as it is. Some folks have setup their Amigas to be used on day-to-day things like IRC, email, word-processing and the like. I would like to do that in the future, but maybe with an A600 or A1200? I'd use a modern monitor, get all the latest hardware upgrades and have it on my desk in the office. I look forward to trying that.
But this A500 has a different role. It's designed to be somewhat 'evergreen'. It sits in our front room, ready to be played along with consoles, other computers and cabinets. It's not the same as the Amiga I had in my youth but I don't think that matters too much. In some ways, it's better. It certainly cheers me up from time to time - you can't ask for more than that!
